Follow us:


Customizing your WordPress site is exciting, but it can also be risky. If you edit your theme’s files directly, every update from the theme developer can wipe out your changes. This is where child themes come in. They let you keep all the functionality of your main (parent) theme while safely adding your own customizations.
In this guide, we’ll walk through what child themes are, why you should use them, and step-by-step instructions to create one manually or with plugins. By the end, you’ll be confident about building and working with a child theme in WordPress.
What is a Child Theme?
A child theme is a theme that inherits the features, design, and layout of another theme, known as the parent theme. Think of it like a layer sitting on top of the parent theme. You can modify styles, templates, and even add new functions in the child theme without ever touching the original files.
When WordPress loads your site, it first looks at the child theme. If a particular style or template exists there, it will use it. Otherwise, it falls back on the parent theme. This way, you get both stability and flexibility.
Why You Should Use a Child Theme
Here are some key reasons to use a child theme:
- Safe Updates: When the parent theme gets updated, your changes remain untouched.
- Easy Customization: You can override only what you need. No need to create a whole new theme.
- Learning Opportunity: For beginners, it’s a great way to explore theme development without starting from scratch.
- Flexibility: Add new templates, tweak CSS, or write custom functions—all without affecting the parent theme.
Things to Do Before Creating a Child Theme
Before diving in, make sure you’re prepared:
- Basic Coding Knowledge: You’ll be working with CSS and a bit of PHP. Even if you’re a beginner, don’t worry—these edits are simple and safe if you follow along carefully.
- Choose the Right Parent Theme: Pick a parent theme that’s close to the look and features you want. The better the parent theme, the fewer changes you’ll need to make.
- Work Safely: Create a backup of your website before experimenting. It’s also a good idea to practice in a local environment or staging site.
Method 1: Manually Creating a Child Theme
This is the classic way to create a child theme. It gives you full control and helps you understand exactly how child themes work.
Step 1: Create a Child Theme Folder
Log in to your control panel (cPanel), then navigate to Files -> File Manager. Click on the File Manager option.

Navigate to your WordPress installation and open wp-content/themes/. Inside this directory, create a new folder for your child theme.
Click the ‘+ Folder’ button in the top left corner to create a new folder for your child theme.
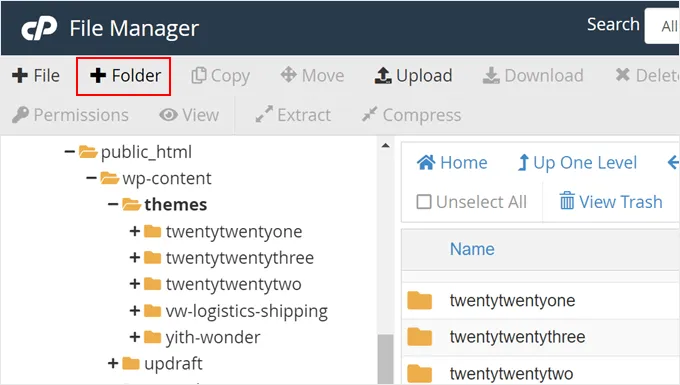
A good naming convention is the parent theme name followed by -child.
For example, if the parent theme is Twenty Twenty-One, name the folder twentytwentyone-child.
Once done, just click ‘Create New Folder.’

Step 2: Add a style.css File
Open the folder you just created and click ‘+ File’ to create the first file for your child theme.

Name this file style.css and click ‘Create New File.’

Now, just right-click on the style.css file.
After that, click ‘Edit’

At the very top of the file, paste this code:
/*
Theme Name:   Twenty Twenty-One Child
Template:     twentytwentyone
*/
NB: The most important line here is Template, which tells WordPress which parent theme your child theme belongs to. It must be a 100% match of the folder name of the parent theme, relative to the wp-content/themes folder. In this case, we know that the Twenty Twenty-One theme folder is located at wp-content/themes/twentytwentyone. Therefore, the Template value must be twentytwentyone.
Once done, just click ‘Save Changes.’

Step 3: Enqueue the Parent Stylesheet
Next, you need to make sure your child theme loads the styles from the parent theme. Create a new file called functions.php inside the child theme folder and add this code:
<?php
function child_theme_enqueue_styles() {
    wp_enqueue_style('parent-style', get_template_directory_uri() . '/style.css');
}
add_action('wp_enqueue_scripts', 'child_theme_enqueue_styles');
This ensures that your child theme uses the parent’s CSS along with your own.
Step 4: Activate the Child Theme
Now go to your WordPress dashboard, navigate to Appearance → Themes, and you’ll see your new child theme listed there. Click Activate, and your child theme will be live.

At this point, your site should look identical to the parent theme, but you’re ready to start customizing without fear of losing changes during updates.
Method 2: Using a Plugin for Classic Themes
If you’re not comfortable editing code, you can create a child theme with a plugin. For classic themes, a popular option is the Child Theme Configurator plugin.
Here’s how to use it:
Install and activate the Child Theme Configurator plugin.
Go to Tools → Child Themes in your WordPress dashboard.
In the Parent/Child tab, you’ll be asked to choose an action. Just select ‘CREATE a new Child Theme’ to get started.

Now, select a parent theme from the dropdown menu. We will select the Hestia theme.
Now click the ‘Analyze’ button.

Next, enter a folder name, keep it short.
Now, you need to select where to save the new styles. We will use the default setting: Primary Stylesheet.
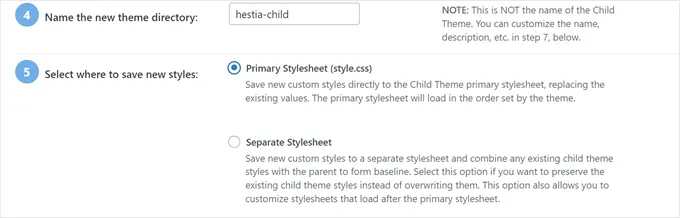
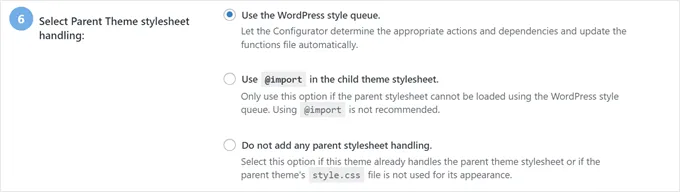
Select Parent Theme stylesheet handling: Here, We will just go with the default ‘Use the WordPress style queue’ as it will let the plugin determine the appropriate actions automatically.
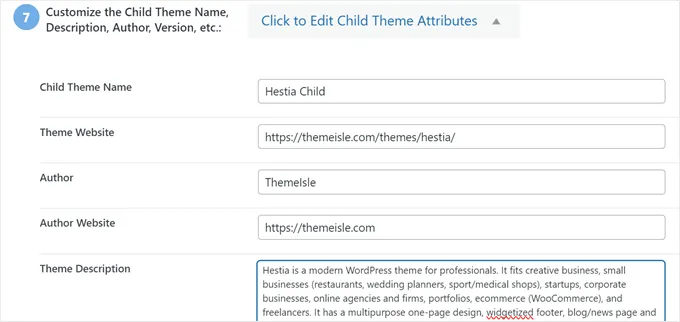
When you get to step 7, you’ll need to click the button labeled ‘Click to Edit Child Theme Attributes’, if you want to modify your child theme details.
When you create a child theme manually, you will lose the parent theme’s menus and widgets. Child Theme Configurator can copy them from the parent theme to the child theme. Check the box in step 8 if you’d like to do this.
Finally, click the ‘Create New Child Theme’ button to make your new child theme.

The plugin will create a folder for your child theme and add the style.css and functions.php files you’ll use to customize the theme later.
Now, click the ‘Preview your child theme’ link to make sure it looks good and doesn’t break your site.

If everything seems fine, click the ‘Activate & Publish’ button.

This method is quick and safe, especially if you just want to get started without touching code.
Bonus: Child Theme Generators
Find out if your theme has a child theme generator—for instance, Astra, Blocksy, OceanWP, and others let you generate a child theme.
If you use Astra theme, you can visit Astra Child Theme Generator.
Method 3: Using a Plugin for Block Themes
If you’re using a block-based (full site editing) theme, there’s a special plugin for creating child themes called Create Block Theme.
Steps to follow:
Install and activate the Create Block Theme plugin.
Go to Appearance → Create Block Theme in your dashboard.
Select “Create a child of [Your Theme].”

Enter details such as the theme name, description, and author.
Click on the ‘Create Child Theme’ button.
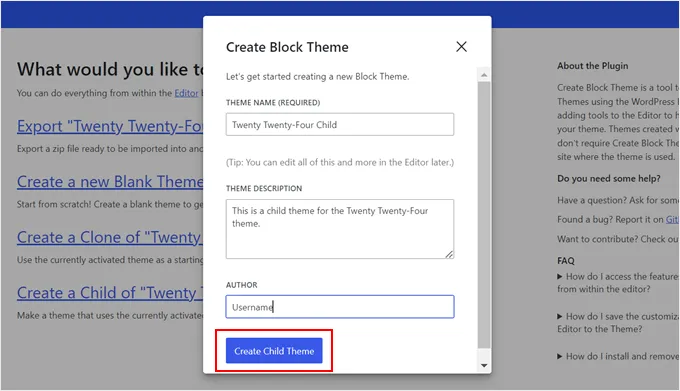
Once done, your website will automatically activate this newly created child theme. You can confirm this by going to Appearance » Themes.

This method works perfectly with modern WordPress block themes.
Customizing Your Child Theme
Once your child theme is set up, the fun begins:
- Override Styles: Add CSS rules to your
style.cssto change colors, fonts, or layouts. - Modify Templates: Copy any template file (like
header.phporfooter.php) from the parent theme into your child theme folder and make your edits there. WordPress will use the child version instead of the parent. - Add New Functions: Extend your theme by writing custom functions inside the child theme’s
functions.php.
The beauty of this approach is that you can experiment freely without affecting the parent theme.
Final Thoughts
Creating a child theme in WordPress is one of the smartest steps you can take if you want to customize your website. Whether you go with the manual method for full control, or use a plugin for quick setup, the end result is the same—you’ll be able to make changes safely and preserve them through updates.
If you’ve been holding back from customizing your theme, now you know the safe way to do it. Start small, experiment with styles, and slowly add more customizations as you get comfortable. With child themes, you get the freedom to make your site truly yours without the constant worry of losing your hard work.


