Follow us:


WordPress is a powerful content management system that comes with two default content types: Posts and Pages. While these are suitable for blogs and static pages, many websites need to manage different kinds of content—like portfolios, testimonials, movie reviews, events, products, and more. That’s where Custom Post Types (CPTs) come in.
Custom post types allow you to structure and organize your content in a way that suits your website’s unique needs. Whether you’re building a complex business site, a movie database, a recipe blog, or an online directory, learning how to create and use custom post types will take your WordPress development skills to the next level.
In this guide, we’ll explore:
- What custom post types are
- When to use them
- Two methods to create custom post types (plugin and code)
- How to display CPTs on your website
- How to enhance them with taxonomies, search, and templates
Let’s dive in.
What is a Custom Post Type?
A custom post type is simply a different type of content in WordPress, beyond Posts and Pages. For example, if you’re running a movie review site, you might want to create a “Movies” post type, where each post represents a different film. This helps keep your content organized and separate from regular blog posts.
Each post type can have its own set of fields, categories, templates, and display settings. You can also assign different user roles, taxonomies, and custom metadata to each post type for more control and flexibility.
When Should You Use a Custom Post Type?
Not every website needs custom post types. But here are some clear signs that your site could benefit from one:
- You want to create a content section with its own archive and single post templates (like “Books,” “Projects,” or “Testimonials”).
- Your content doesn’t fit well within Posts or Pages.
- You want a different editing interface or set of features (like custom fields or specific taxonomies).
- You want better content separation and organization in the WordPress dashboard.
Some common use cases include:
- Portfolios for designers or photographers
- Real estate listings
- Recipes for cooking blogs
- Product catalogs
- Movie or book reviews
- Job listings
- Event calendars
Now let’s walk through two popular methods of creating custom post types in WordPress.
Method 1: Using a Plugin (Best for Beginners)
If you’re not comfortable writing code, the easiest way to create custom post types is by using a plugin. You can use Advanced Custom Fields (ACF) plugin.
Step 1: Install and Activate the Plugin
- Go to your WordPress dashboard
- Navigate to Plugins > Add Plugin
- Search for “Advanced Custom Fields”
- Click Install and then Activate

Step 2: Create a New Custom Post Type
Now that ACF is active, the next step is to create your custom post type.
- Navigate to ACF > Post Types in your WordPress dashboard.
- From here, click Add New to add a brand new custom post type.

Fill in essential details:
- Plural Label: Quotes
- Singular Label: Quote
In this example, let’s call the new custom post type Quotes. This could be anything based on your site’s needs, whether it’s movies, books, events, or any other content type you want to manage separately.
ACF will automatically generate the post type key for you, but you can modify this if you wish.

Step 3: Configure Post Type Settings
Once you’ve named your custom post type, you’ll need to configure its settings.
Scroll down and enable Advanced Configuration.

Go to the URLs section and enable Archive toggle.

Optionally, you can enter Archive Slug, if you wish. This will define the URL for the archive page of your custom post type (e.g., /quote). If you don’t provide an archive slug, it will use the Post Type Key as archive slug. If you are okay with the Post Type Key as the URL for the archive page, leave the Archive Slug box empty to avoid complexity.
After configuring the settings, click on Save Changes.
That’s it! Your new post type will now appear in the WordPress dashboard menu, and you can begin adding content.
Step 4: Add Custom Taxonomies
WordPress has default Categories and Tags to organize your posts. Now, if you want to organize your custom post type this way too, you need to add custom taxonomies.
To do so, go to ACF > Taxonomis and click on Add Taxonomy.

1. Create Category-type Taxonomy:
Give your taxonmy a name. Select your Post Type. Don’t forget to toggle on Hierarchical taxonomy to make it function like category.

Now, click Save Changes.
2. Create Tag-type Taxonomy:
Give your taxonmy a name. Select your Post Type. Keep the toggle off for Hierarchical taxonomy to make it function like tag.

Now, click Save Changes.
Method 2: Registering a Custom Post Type Manually via Code
For developers or those comfortable with code, you can manually register a custom post type by adding a function to your theme’s functions.php file or via a code snippets plugin.
Here’s a sample code snippet to register a “Quotes” post type:
<?php
function my_custom_post_quote() {
// quote cpt
  $labels = array(
    'name'               => _x( 'Quote', 'post type general name' ),
    'singular_name'      => _x( 'Quote', 'post type singular name' ),
    'add_new'            => _x( 'Add New', 'quote' ),
    'add_new_item'       => __( 'Add New Quote' ),
    'edit_item'          => __( 'Edit Quote' ),
    'new_item'           => __( 'New Quote' ),
    'all_items'          => __( 'All Quotes' ),
    'view_item'          => __( 'View Quote' ),
    'search_items'       => __( 'Search Quotes' ),
    'not_found'          => __( 'No quotes found' ),
    'not_found_in_trash' => __( 'No quotes found in the Trash' ),
    'parent_item_colon'  => '',
    'menu_name'          => 'Quotes'
  );
  $args = array(
    'labels'        => $labels,
    'description'   => 'A quote can change your life.',
    'public'        => true,
    'menu_position' => 5,
    'supports'      => array( 'title', 'editor', 'thumbnail', 'excerpt', 'comments' ),
    'has_archive'   => true,
  );
  register_post_type( 'quote', $args );
  // quote cat
  $catlabels = array(
    'name'              => _x( 'Topics', 'taxonomy general name' ),
    'singular_name'     => _x( 'Topic', 'taxonomy singular name' ),
    'search_items'      => __( 'Search Quote Categories' ),
    'all_items'         => __( 'All Quote Categories' ),
    'parent_item'       => __( 'Parent Quote Category' ),
    'parent_item_colon' => __( 'Parent Quote Category:' ),
    'edit_item'         => __( 'Edit Quote Category' ),
    'update_item'       => __( 'Update Quote Category' ),
    'add_new_item'      => __( 'Add New Quote Category' ),
    'new_item_name'     => __( 'New Quote Category' ),
    'menu_name'         => __( 'Quote Categories' ),
  );
  $catargs = array(
    'labels' => $catlabels,
    'hierarchical' => true,
  );
  register_taxonomy( 'quote-topic', 'quote', $catargs );
  // quote Tag
  $taglabels = array(
    'name'              => _x( 'Writers', 'taxonomy general name' ),
    'singular_name'     => _x( 'Writer', 'taxonomy singular name' ),
    'search_items'      => __( 'Search Quote Tags' ),
    'all_items'         => __( 'All Quote Tags' ),
    'parent_item'       => __( 'Parent Quote Tag' ),
    'parent_item_colon' => __( 'Parent Quote Tag:' ),
    'edit_item'         => __( 'Edit Quote Tag' ),
    'update_item'       => __( 'Update Quote Tag' ),
    'add_new_item'      => __( 'Add New Quote Tag' ),
    'new_item_name'     => __( 'New Quote Tag' ),
    'menu_name'         => __( 'Quote Tags' ),
  );
  $tagargs = array(
    'labels' => $taglabels,
    'hierarchical' => false,
  );
  register_taxonomy( 'quote-writer', 'quote', $tagargs );
}
add_action( 'init', 'my_custom_post_quote' );NB: If you don’t want category and tag functionality, remove the yellow-colored code.
What This Code Does:
- Registers a post type named “quotes”
- Sets labels for admin and user interfaces
- Enables archive pages at
/quote/ - Supports features like featured images, comments, and excerpts
You can modify the slug, supported features, and labels to match your needs.
Displaying Custom Post Types on the Frontend
After creating your CPT, WordPress will automatically generate a default archive and single page. However, to make them visible and styled properly, you may need to customize your theme.
In the browser’s address bar, append the archive slug to the home page URL. For example, browse yourwebsite.com/quote to view your custom post type archive. You can check how we did on our community blog: Quote Collection
Add CPT to Menus
- Go to Appearance > Menus
- If your new post type isn’t visible, click Screen Options at the top and check it
- Add your post type’s archive link to the navigation menu

Create a Custom Archive Template
If you don’t like the appearance of the archive page for your custom post type, then you can use a dedicated template for custom post type archives.
For classic theme:
To customize how your CPT archive looks:
- Create a file in your theme folder named
archive-{posttype}.php(e.g.,archive-quote.php) - Use this file to define how your list of posts is displayed
Make sure you replace ‘quote’ with the name of your custom post type.
To get started, you can copy the contents of your theme’s archive.php file into the archive-quote.php template and then modify it to meet your needs.
Now, whenever the archive page for your custom post type is accessed, this template will be used to display it.
For block theme:
Navigate to Appearance > Editor from your WordPress dashboard.

Once inside the editor, go to Templates.

Click on Add Template.

You should see an option for Archive: post type. In this case, it will be specific to your custom post type, like Archive: Quote.
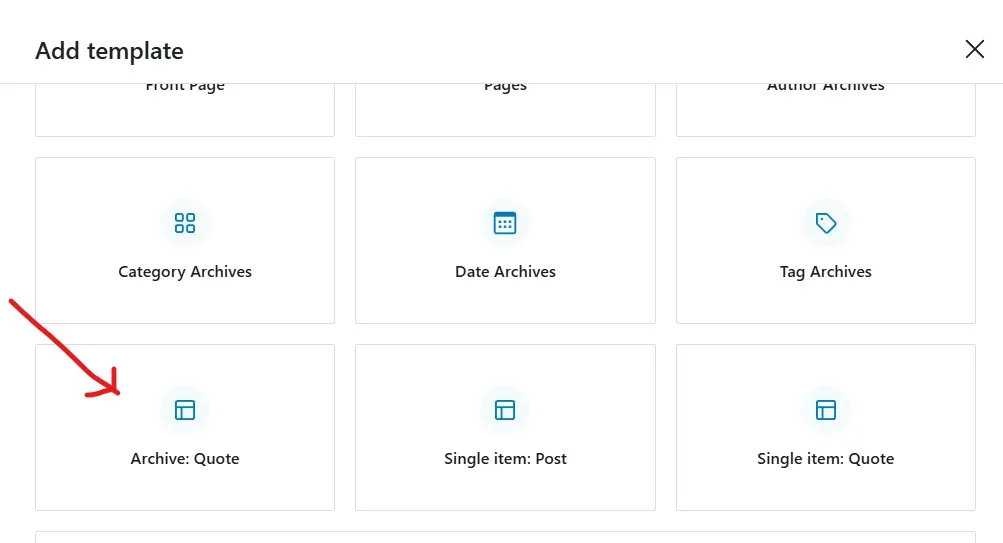
Select this option to create a custom archive template for the “Quote” post type.
Select an existing pattern to start with:

- Use the FSE editor to design and customize the layout of your archive page.
- You can add a Post Title Block, Post Content Block, Post Excerpt Block, etc., depending on your preferences.
- Customize the typography, layout, and other design elements.
- Once you’re satisfied with the design, click on Save Changes.
Create a Custom Single Template
For classic theme:
- Similarly, create a file named
single-{posttype}.php(e.g.,single-quote.php) - Design this file to customize the look of individual posts
Don’t forget to replace ‘quote’ with the name of your custom post type.
You can get started by copying the contents of your theme’s single.php template into the single-quote.php template and then modifying it to meet your needs.
For block theme:
This is similar to creating a custom archive template. This time, select Single item: Quote
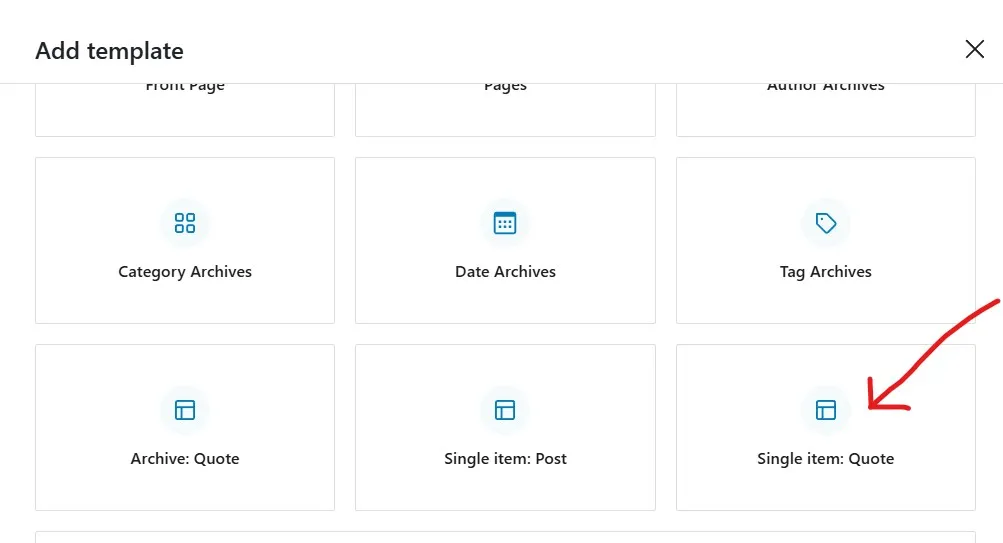
Use the FSE editor to design and customize the layout. Once you’re satisfied with the design, click on Save Changes.
This gives you full control over the appearance and layout of your custom post types.
Bonus: Querying Custom Post Types in Classic Theme
If you are familiar with coding and would like to run loop queries in your templates, then here is how to do that. By querying the database, you can retrieve items from a custom post type.
You will need to copy the following code snippet into the template where you wish to display the custom post type.
<?php
$args = array( 'post_type' => 'quote', 'posts_per_page' => 10 );
$the_query = new WP_Query( $args );
?>
<?php if ( $the_query->have_posts() ) : ?>
<?php while ( $the_query->have_posts() ) : $the_query->the_post(); ?>
<h2><?php the_title(); ?></h2>
<div class="entry-content">
<?php the_content(); ?>
</div>
<?php endwhile;
wp_reset_postdata(); ?>
<?php else:  ?>
<p><?php _e( 'Sorry, no posts matched your criteria.' ); ?></p>
<?php endif; ?>
This code defines the post type and number of posts per page in the arguments for our new WP_Query class. It then runs the query, retrieves the posts, and displays them inside the loop.
Include CPTs in Search Results
By default, WordPress search only looks through Posts. To include your custom post type, you can add a filter in functions.php:
function wp_passion_include_cpt_in_search($query) {
  if ($query->is_search && $query->is_main_query()) {
    $query->set('post_type', ['post', 'quote']);
  }
  return $query;
}
add_filter('pre_get_posts', 'wp_passion_include_cpt_in_search');
This ensures your CPT content shows up in site-wide search results.
Add Custom Fields or Meta Boxes
Use the Advanced Custom Fields (ACF) plugin to add custom fields to your post type.
They have tutorials for this. As for example, you can follow this tutorial: Adding Fields to a Taxonomy Term
Final Thoughts
Custom post types are one of the most powerful tools in WordPress. They allow you to build websites that go far beyond blogging. Whether you’re organizing a library of resources, managing a directory, or creating a portfolio, CPTs give you the structure and flexibility you need.
If you’re just starting, the plugin method is the safest and most user-friendly. But for full control, registering your own CPTs through code is a must-learn skill for any WordPress developer.
Take your time experimenting with different configurations, and don’t forget to create custom templates and fields to truly make your CPT shine.
Let us know what type of custom content you’re building in the comments.