Follow us:


Many beginners start their blogging journey with WordPress.com because it is easy, fast, and requires no technical setup. However, as your blog grows, you may quickly realize that WordPress.com has serious limitations when it comes to customization, monetization, plugins, and full control over your website.
That’s when moving to self-hosted WordPress.org becomes the natural next step.
In this comprehensive guide, you’ll learn exactly how to move your blog from WordPress.com to WordPress.org, without losing your content, SEO rankings, or readers. Even if you’re not a technical person, this guide will walk you through everything step by step.
WordPress.com vs WordPress.org: What’s the Difference?
Before migrating, it’s important to understand why this move matters.
Limitations of WordPress.com
With WordPress.com, especially on free or lower-tier plans, you face restrictions such as:
- No ability to install custom plugins
- Limited theme customization
- Restricted monetization options
- WordPress.com branding on free plans
- Less control over performance and SEO
- You don’t fully own your website
Advantages of WordPress.org
When you move to WordPress.org, you get:
- Full ownership of your website and content
- Ability to install any plugin or theme
- Complete design and functionality freedom
- Better SEO control
- Monetization without restrictions
- More performance optimization options
In short, WordPress.org gives you full control, which is why most serious bloggers eventually make the switch.
What You Need Before Moving Your Blog
Before starting the migration process, make sure you have the following ready:
- A domain name (new or existing)
- A web hosting account that supports WordPress
- Access to your WordPress.com dashboard
- Basic familiarity with logging into WordPress
If you already have hosting and a domain, you’re good to go. If not, many hosting providers offer one-click WordPress installation, which makes setup very easy.
Step 1: Set Up Your New WordPress.org Website
First, you need a fresh WordPress.org installation.
Install WordPress
Most hosting providers offer:
- One-click WordPress installer
- Auto-configured database
- Pre-installed SSL
Once installed, log into your new WordPress dashboard (usually at yourdomain.com/wp-admin).
Make sure:
- WordPress is loading correctly
- You can access the admin area
- Your site is empty (default posts are fine)
Step 2: Export Content from WordPress.com
Now it’s time to export your existing blog content.
Export Your Data
- Log in to your WordPress.com dashboard
- Go to Tools → Export
- Choose Export All
- Download the export file (XML format)
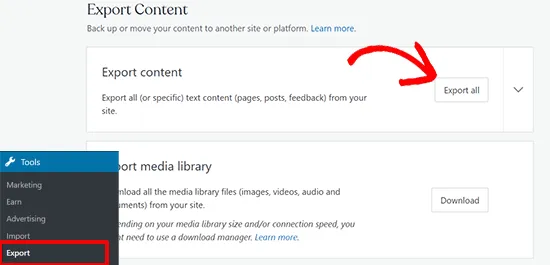
This file includes:
- Posts
- Pages
- Categories and tags
- Comments
- Media references
Once the export file is ready, a download link will be visible. You can click to download the zip file on your computer.
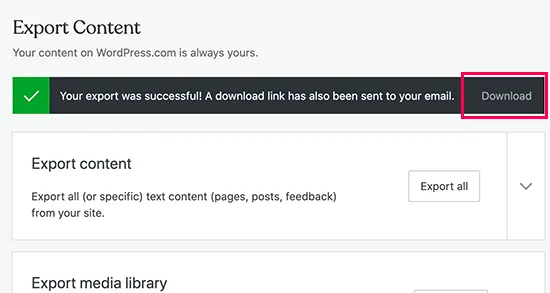
Once you have downloaded the file to your computer, you need to unzip it.
Inside it, you’ll find an XML file with all your posts, pages, images, comments, custom fields, categories, tags, navigation menus, and other data.
Keep these files safe—you’ll need them in the next step.
Step 3: Import Content into WordPress.org
Now you’ll import the exported content into your new site.
Import the Content
- Log in to your WordPress.org admin area
- Go to Tools → Import
- Choose WordPress
- Install the WordPress Importer
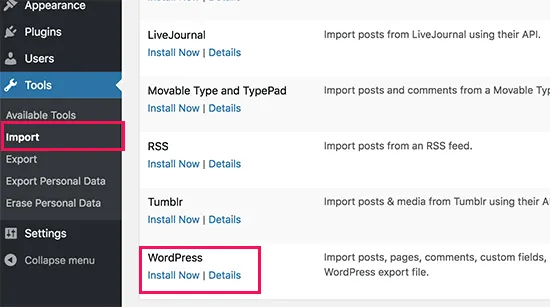
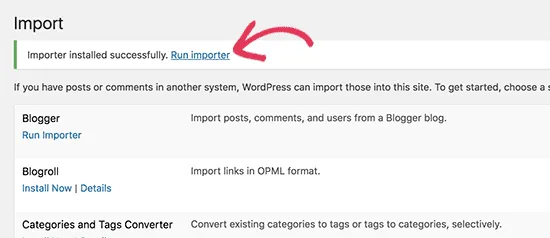
WordPress will now install the WordPress importer for you.
Once it’s done, click on the ‘Run importer’ link to continue.
Upload the XML file you downloaded earlier.
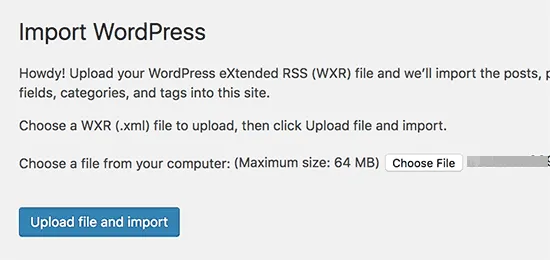
During the import process:
- Assign posts to an existing user or create a new one
- Check the option to download and import file attachments
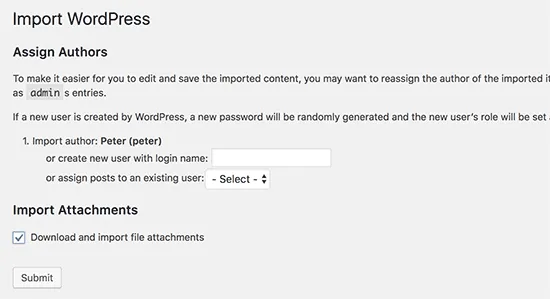
This ensures your images and media files are copied to your new site.
Step 4: Set Up Permalinks Properly
Permalinks play a major role in SEO and user experience.
Match Your Old URL Structure
- Go to Settings → Permalinks
- Choose Post name or a structure similar to your WordPress.com URLs
- Save changes
This helps avoid broken links and SEO issues after migration.
Step 5: Redirect Visitors from WordPress.com to WordPress.org
If you have a custom domain on WordPress.com, you don’t have to worry. Simply change the DNS record to your host, and you will retain all the SEO benefits.
If you don’t have a custom domain on WordPress.com, you need to redirect visitors from WordPress.com.
Without proper redirection:
- Visitors may land on your old site
- Search engines may not recognize your new site
- You could lose traffic and rankings
Set Up Site Redirect
Since you don’t have access to the .htaccess file on WordPress.com, you cannot make any changes to redirect your users. However, WordPress.com offers a Site Redirect feature (paid yearly).
Once enabled:
- All visitors are automatically redirected to your new WordPress.org site
- Search engines gradually update your new URLs
- You retain SEO value
If you don’t want to pay for the site redirect, you may need to set your WordPress.com blog to private. Otherwise, you will face the duplicate content problem. Visit your old blog’s WordPress.com dashboard. From the left menu, you need to click Settings » General menu and scroll down to the ‘Privacy’ section.
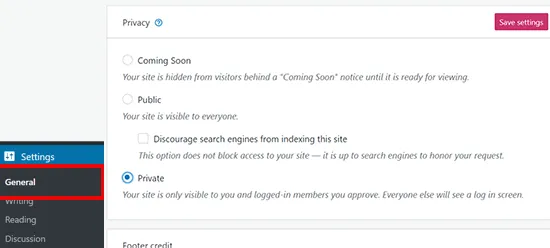
From here, you need to select the ‘Private’ option and then click on the ‘Save settings’ button.
Step 6: Update Internal Links
Your posts may still contain links pointing to the old WordPress.com URLs.
Fix Internal Links
- Install a search and replace plugin like Search & Replace Everything
- Replace old domain URLs with your new domain
Step 7: Test Everything Thoroughly
Before announcing your new site, test everything carefully.
Final Checklist
- Open multiple posts and pages
- Check images, videos, and embeds
- Test menus and widgets
- Verify contact forms
- Confirm redirects are working
- Check site speed and mobile responsiveness
Fix any issues before going live.
Final Thoughts
Moving from WordPress.com to WordPress.org is one of the best decisions you can make for the long-term growth of your blog. While the process may seem overwhelming at first, following a structured, step-by-step approach makes it surprisingly manageable.
Once migrated, you’ll enjoy:
- Full control
- Better performance
- Unlimited customization
- Stronger monetization potential
If you’re serious about blogging, WordPress.org gives you the freedom and flexibility your site truly deserves.